Scrivener for Authors

This is a very short comment as an add-on to my video about writing with Scrivener. I’d recommend you take a few minutes to watch the video before reading on, because it’ll make more sense!
When I was talking about the way that Scrivener works for me, the main thing is, it’s entirely flexible. It doesn’t force the author to work in a specific way, it is intuitive and lets the user define how it’ll work.
Scrivener has three main areas: the ‘binder’ on the left; the workspace in the middle, and the information space on the right. These are my terms, incidentally, not Scrivener’s.
The binder is where all the documents you are working on are kept. They work as file boxes clipped into a large lever-arch file, each file box having one or a number of pages held within. Sometimes I use the files as simply a running timeline (I did that for Act of Vengeance). That way, the storyline is quite simple and the management of the plot is more looking at characterisation. For that book I had simple colour-coordination to show character point of view. Thus I could tell at a glance which character was taking over the plot, and could change the POV to balance the way I was telling the story.
In other books I’ve used a package called Aeon Timeline to control the timeline. This works well with books such as Fields of Glory, in which I had a simple timeline, and it made sense to have the timeline really clear before I started writing, because I had to be held to it rigidly. (I don’t like to change history!) What I really like here is the fact that Aeon and Scrivener are synched, so once I have the timeline sorted as I want it, I export that into Scrivener, and miraculously all my card headings, i.e. the scene headings in the binder, are imported for me.

An Aeon Timeline screenshot to show how a timeline develops. Simple but very effective!
In that book, I changed the colour coordination so that the scenes represented the levels of conflict or action. It was up to me: I define how I use Scrivener.
This is a standard Scrivener screen:
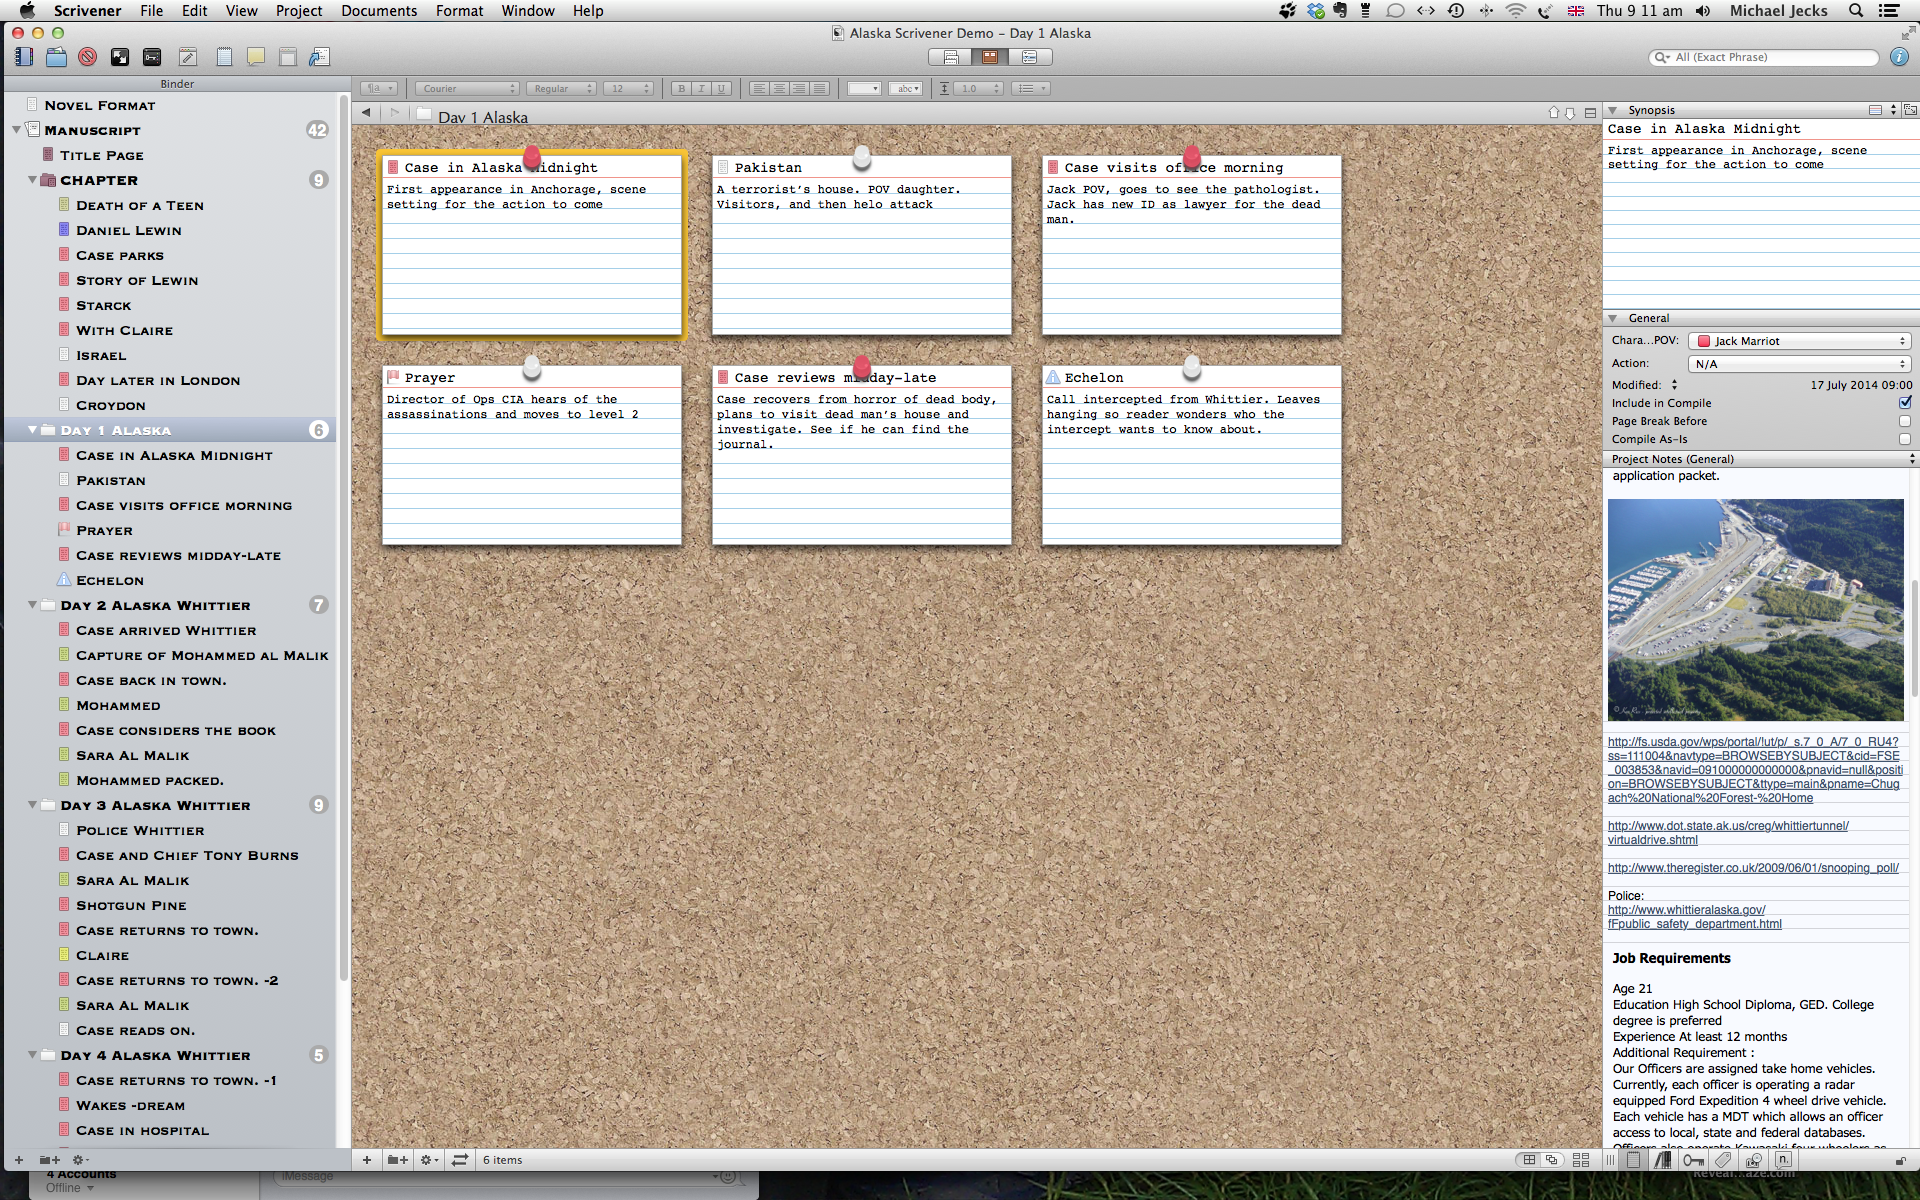
A standard screen to show how the record cards are displayed on the cork board.
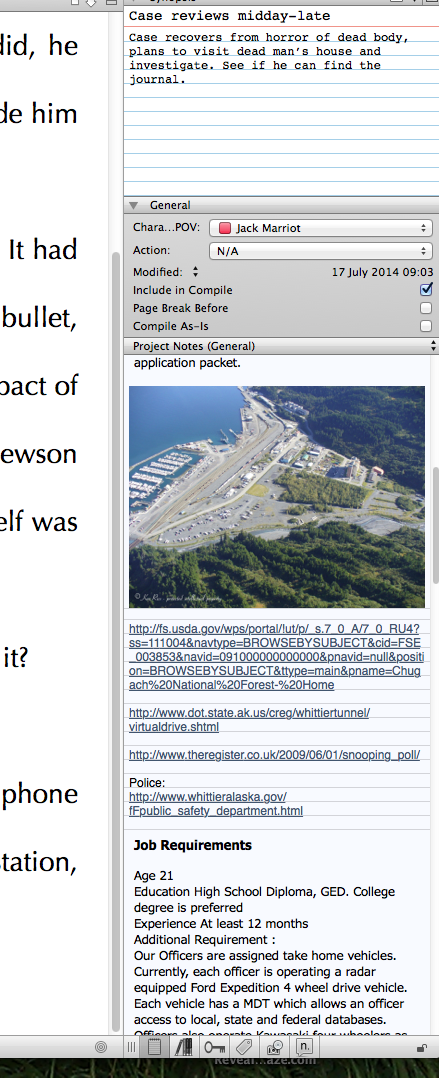
Close up of right side with record card, pictures, web links, anything needed for research.
As you can see from this cork board display, Scrivener is displaying a simple summary set out on record cards. This is how many writers work, with record cards detailing each scene. I used to use a whole pile of strips of paper, stuck on my walls with half a ton of blutack. Now, all that is unnecessary. I go from a rough outline on a whiteboard or on several sheets of A4, to these record cards on Scrivener.
To flit to the right hand side for a moment: this is where all the notes and working information goes.
So, at the top there is a record card for the document – which for me equates to the scene. This has a title for the scene, and then a brief synopsis.
The synopsis and the title are entirely up to me, the writer. The main idea of the synopsis is, for me, to tell me what the narrative direction is for that scene. Is it going to be mainly dialogue, is it mainly action, is it a scene to link to the next one (I often write very quickly, and when linking scenes don’t occur to me I’ll get on with writing the next scene anyway, and sort out missing bits later, when I can sit back and add them in at edit).
Underneath the record card there’s the general stuff about the scene. Who’s POV am I using, what sort of action is needed: is it a first draft, final, revised, or what? After that there is when it was last modified, and some details on whether or not to use it on compile.
After that is the important section, for me. This is my reminder section.
Within Scrivener you have project notes and document notes. I tend to use project notes only. But these are the things you need to have in your book at all times. For me, these are the things for which I usually have a book open on my desk. They are the historical details, the pictures, the maps, the facts about the area – anything, in short, which could be of use to my story.
I will always have additional books open at a relevant page on my desk, but Scrivener allows me to plan things and put them here so that I need only scroll through the project notes to find the relevant item of information.
However, it’s not just things typed or scanned in. It allows me to draw in pictures from the internet, or to add weblinks. You can see here that much of the text is underlined. That is all a hyperlink.
Beneath that you can see some other symbols. These will change from notes to keywords etc. You can basically add and use any kind of information you want here. And again, it means that all the time you’re working, you are typing in the most effective manner. There’s no stopping to go and find the relevant section in a book, or to go and try to find again that one link you had to a website that had the perfect summary for you: it’s all there, on the screen in front of you.
To look at the left hand side, then: we have first the binder

Close up of the binder showing how to change POV colour, flags, etc.
This is effectively a series of folders all held in a binder. Of course, the folders can all be reordered. If you want, you can click, drag and drop any of the folders to reorder the whole story. If you decide that the book isn’t working this way, then change the flow of the story. No need to search through a 140,000 words book in Word to find the relevant section, just drag and drop in the binder.
At the side of each binder heading you will see that there are folder symbols. These are Apple symbols indicating that there are a number of files held within. For that reason I tend to think of each folder as a chapter in my book, even though I don’t stick to that. Each file within a folder becomes a scene.
But that’s not all. Within each folder, when you click on it, are all the scenes that make up that chapter or folder. So these too can be rearranged. And each can be flagged. For example, each can be colour-coordinated so that, as in this case, I can select which character is driving the scene. However, more than that, if you look at “Echelon” in the record card display above, or as the third heading in the binder here, you can see I’ve changed the document symbol for a warning. Two scenes above, “Prayer” has a red flag.
I use these all the time, both to remind me where I have more work to do, and to allow me to remember where the key action scenes are. If there is conflict, I mark it; if there is a fight, I mark it.
Scrivener has a huge amount of power – but the main thing for me is, its flexibility. I can use it however I want to. And the lovely, lovely part is, when I’m typing, all of this disappears. When I want to type, Scrivener brings up a white page with all distractions concealed. I can type for hours with only the pictures, the smells, the sounds playing in my mind.
I have spoken about Apple and Scrivener. Scrivener was originally designed and implemented only for Apple. However, now it has also been rewritten and implemented for Windows. Personally, I wouldn’t want to go that route, but it’s an option for all those who prefer their windows machines. For information on Scrivener, go and look at www.literatureandlatte.com. On the other hand, if you have any questions about how I use it, do please ask in the comments section below. I’ll be happy to help if I can!
Happy writing!
Comments
17 Responses to “Scrivener for Authors”Trackbacks
Check out what others are saying...-
[…] This is a very short comment as an add-on to my video about writing with Scrivener. I'd recommend you take a few minutes to watch the video before reading on, because it'll make more sense! When I … […]
LikeLike
-
 Writing a Novel with Story Bible Using Scrivener and (soon) Aeon Timeline | Catholic Heart and Mind says:
 […] is an interesting looking post about using Scrivener and Aeon Timeline by a published author who uses both. (I know nothing about the author or his books having only just […]
LikeLike


Reblogged this on Chris The Story Reading Ape's Blog….. An Author Promotions Enterprise!.
LikeLike
I haven’t used Scrivener yet, but this makes it seem not as daunting as I thought! Thanks for sharing :)
LikeLike
My pleasure. It really ease ridiculously easy and straightforward. Main thing is, you can use it however you want. It’s entirely flexible. I don’t use half the functions, but the binder, the project notes, the outliner with cards on a cork board and the typing environment all make it hugely productive for me.
LikeLike
I have been avoiding trying this. It just seemed way too complicated. I may have to give it a shot now. Thank you!
LikeLike
Please do. You can get free trials, I think (I did in my day!). Don’t worry about the details or complexity, though. Try the absolute basics and see how you get on. If those work for you, you can then play with the technical stuff. I don’t bother. It’s so good as an environment to work in that I am happy just with that!
LikeLike
Reblogged this on Lifein64SquareFeet.com – A Writer's Survival Blog and commented:
I’ve been a Scrivener user (on Windows) since it was in beta, and I am a believer. I do think it is important to use it as a tool to write, and not get too wrapped up in all the bells and whistles of the program, tweaking settings and playing around with features rather than, you know, writing your book. Check out this article and the accompanying video. Also note that Scrivener has a free trail version if you want to take it for a spin, and if you do decide to buy it, it’s very affordable.
LikeLike
Many thanks for reflagging!
LikeLike
Reblogged this on theowlladyblog.
LikeLike
Hi, I am having trloube creating in Word for Mac, a list of tables. I have already a Table of Content and a List of Figures, but when I prompt in Index and Tables the Table of Tables, it never works. Any recommendations?Cheers!
LikeLike
Very good post. As a writer who has battled with the idea of Scrivener, I am considering giving it another whirl. My concern is if I work in Scrivener, is there a way I can transfer my work back to Word where I’d like my final document for editing and track change purposes? Could this be done through compiling, or at least by copy and pasting each chapter?
LikeLike
Hi, Debby – thanks for the comments. I was worried about going to Scrivener at first – hell, we’re all petrified about sudden problems with our software, aren’t we!I’m just composing an answer for you which’ll go up today in my blog – mainly because I cannot figure out how to insert a screenshot into this response!
LikeLike
Thank you so much. I look forward to it. :)
LikeLike
Debby, post answering your questions is now up at http://wp.me/p1u0dV-ig Hope this helps!
LikeLike
Many thanks. I’m glad the piece was useful. Let me know if you have any questions.
LikeLike